ARDUINO IDE
ARDUINO IDE SETTING FOR EVIVE
Components required: evive, USB cable and a computer
One of the simplest
environments for programming evive is the Arduino IDE. These steps will walk
you through downloading and setting it up to use with evive.
1.The Arduino IDE can be
downloaded from the official website. The instructions for installation on
Windows, Mac or Linux operating systems can be found there.
Note: Please note that evive needs a version of the IDE
>= 1.6, so in case you already have the IDE installed on your computer
please update it.
2.Download evive’s firmware
from here. Unzip the file (using a software like 7-zip), go to the extracted
files and open >>evive.ino. This should open the file evive.ino in
Arduino IDE.
3.Plug one end of the USB
cable provided into evive, and the other end into a USB jack of your computer.
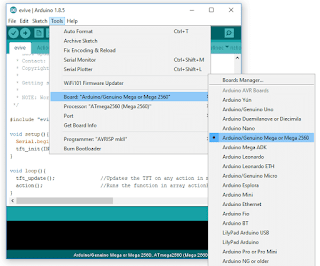
4.In the menu bar near the top
of the screen, navigate to Tools->Board and select “Arduino/Genuino Mega or
Mega 2560”. This should also automatically set the processor to “ATmega2560
(Mega 2560)“
 |
| FIRST STAGE |
 |
| SECOND STAGE |
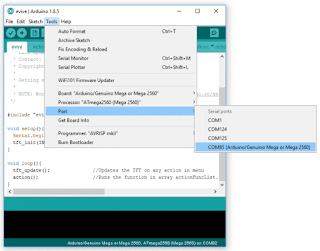
5.Now select the serial port
at which evive is connected, by navigating to Tools->Port and choosing the
appropriate port. It should be the one which says in brackets “Arduino/GenuinoMega or Mega 2560”.
6.Upload the code by clicking
on the upload button (second from the left)
 |
| FOURTH STAGE |
Note: The port submenu will be active only if evive is
plugged in and the driver was successfully installed by your operating system.
Please see the Troubleshooting Guide for more information.
7.You will see “DoneUploading” message once the code is uploaded.
 |
| FINAL STAGE |


Comments
Post a Comment